
To effectively schedule and assign tasks using Wrike, start by creating a clear task list, then set deadlines, priorities, and assignees directly within the platform. Use Wrike’s calendar and timeline views to visualize your project timeline, ensuring everyone knows what to do and when. Utilize automation and notifications to keep your team on track and informed throughout the process. With these steps, managing tasks becomes more streamlined and efficient, helping your team hit deadlines and stay organized.
Managing tasks can feel overwhelming, especially with multiple projects and team members involved. Wrike simplifies this by offering a user-friendly interface where you can easily assign responsibilities, set due dates, and monitor progress all in one place. By leveraging Wrike’s scheduling tools and collaboration features, you can keep your projects on track, boost productivity, and ensure clear communication across your team. Whether you’re assigning individual tasks or planning complex projects, Wrike makes organizing work straightforward and stress-free.

How to schedule and assign tasks using Wrike
Using Wrike to schedule and assign tasks is a straightforward process that can greatly improve your team’s productivity. This tool makes it easy to organize work, set deadlines, and ensure everyone knows what to do and when. Let’s explore how you can effectively utilize Wrike for task management.
Understanding the basics of task management in Wrike
Before diving into scheduling and assigning, it’s helpful to understand how Wrike structures tasks. Each task can be a standalone item or part of a larger project. Tasks can contain details such as descriptions, attachments, comments, and due dates.
Adding tasks is simple. You can create a new task by clicking the “+” button, typing in the task name, and hitting enter. This forms the foundation for scheduling and assigning work effectively.
Creating a new task for your project
Start by clicking the “New Task” button. In the task window, enter a clear and concise title that describes the work. Then, add detailed descriptions to specify what needs to be done.
Attachments can be added for reference, and tags can help categorize tasks. These features make it easier to find and manage tasks later.
Setting priorities and deadlines
Once a task is created, set priorities to guide team focus. Wrike allows you to choose from options like Low, Normal, and High priority.
Next, assign a due date to ensure timely completion. Simply select the calendar icon and pick the date. Clear deadlines help keep your project on track.
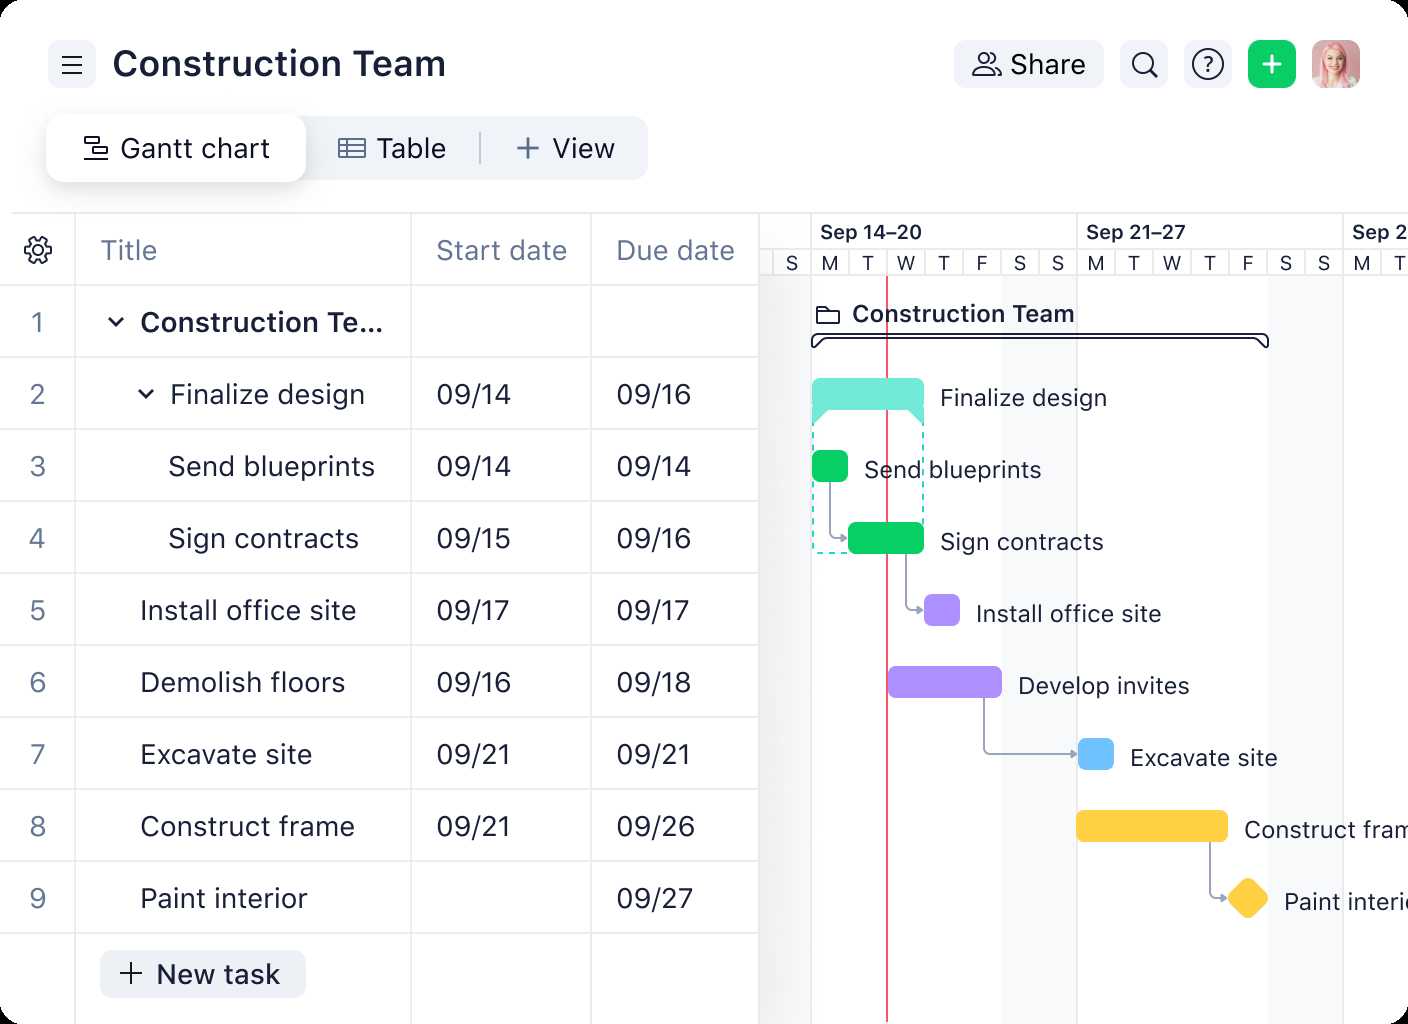
Using the Gantt chart to visualize your schedule
The Gantt chart in Wrike provides a visual layout of your tasks over time. It highlights overlapping tasks and helps you see the overall project timeline.
To use it, switch to the Gantt view. Drag tasks to adjust start and end dates, and easily see dependencies between tasks.
Assigning tasks to team members
Assigning is simple. In the task details, select the team member responsible from the “Assignee” dropdown menu. This assigns full responsibility and visibility.
Include relevant team members in comments or discussions to keep everyone involved and informed about the task.
Utilizing custom fields for better task tracking
Custom fields allow you to add specific information to tasks, such as status, budget, or priority level. This customization helps keep track of particular details unique to your workflow.
Add custom fields through the project settings. Use them to filter and organize tasks efficiently.
Scheduling recurring tasks
For ongoing work, set up recurring tasks. In the task options, select “Repeat” and choose the frequency. This feature saves time and ensures consistent follow-up.
Recurring tasks automatically generate new instances, making routine activities easier to manage.
Automating task workflows with rules
Wrike includes automation rules that trigger actions based on task updates. For example, when a task is marked complete, it can automatically notify the project manager.
Create rules by navigating to the Automation menu. Use these to reduce manual work and keep your project flowing smoothly.
Collaborating effectively on assigned tasks
Commenting directly on tasks facilitates clear communication. Use @mentions to tag team members for specific questions or updates.
Attachments can be added within comments, making sharing files seamless and organized.
Tracking progress with dashboards and reports
Use Wrike’s dashboards to get a quick overview of task statuses, upcoming deadlines, and team workload. This visual summary helps you stay informed at a glance.
Generate reports to analyze task completion rates, overdue items, or team productivity. These insights support better scheduling decisions.
Adjusting schedules and reassigning tasks
As projects evolve, update task schedules by dragging tasks on the Gantt chart or editing due dates. Reassign tasks if responsibilities shift.
Flexibility in scheduling allows your team to adapt quickly, ensuring deadlines are met without stress.
Best practices for effective task scheduling and assignment
- Break down big projects into smaller tasks for easier management.
- Always set realistic deadlines to prevent burnout and missed deadlines.
- Prioritize tasks based on impact and urgency.
- Regularly review and update tasks to reflect project changes.
- Communicate clearly through comments and updates within each task.
Integrating Wrike with other tools for seamless workflow
Wrike connects with many applications like Google Drive, Dropbox, and Slack. Integrate these to attach files easily or notify team members automatically.
This integration helps streamline your workflow, reducing the need to switch between multiple tools.
Summary of key features for scheduling and assigning tasks in Wrike
| Feature | Purpose | Benefits |
|---|---|---|
| Task creation | Start new work items | Clear task structure |
| Due dates | Set deadlines | Timely completion |
| Priorities | Determine importance | Focus on critical tasks |
| Gantt chart | Visual project timeline | Easy schedule adjustments |
| Assignee | Assign responsibility | Accountability & clarity |
| Custom fields | Track specific info | Tailored task management |
| Automation rules | Automate workflows | Less manual work |
Mastering task scheduling and assignment in Wrike requires understanding these core features and applying best practices. With consistent updates and clear communication, your team can work more effectively and meet project goals with confidence.
Manage your work schedule in Wrike
Frequently Asked Questions
How can I set deadlines for tasks to ensure timely completion in Wrike?
To set deadlines for tasks, open the task details and locate the due date field. Click on this field and select an appropriate date from the calendar. Assigning clear deadlines helps team members prioritize their work and ensures tasks are completed on time. You can also adjust deadlines as project needs change to keep everyone aligned with project timelines.
What is the process for assigning tasks to specific team members in Wrike?
Assigning tasks involves opening the task you want to delegate and selecting the team member’s name from the assignee dropdown menu. Make sure the selected individual has the necessary permissions and understands the task requirements. This direct assignment clarifies responsibilities and helps team members know exactly what they need to work on.
How do I schedule recurring tasks to save time on repetitive activities?
To schedule recurring tasks, create a new task and look for the recurrence options within the task settings. Choose the frequency—daily, weekly, monthly, etc.—that matches your needs. By setting up recurring tasks, team members receive automatically generated work items, ensuring ongoing activities stay organized without manual re-entry each time.
How can I view the timeline for scheduled tasks to manage project progress effectively?
Utilize Wrike’s Gantt chart feature to visualize the timeline of your tasks. From the project view, switch to the Timeline or Gantt chart view to see start and end dates for all activities. This visual representation helps you identify overlaps, potential delays, and overall progress, allowing for better scheduling adjustments.
What are the best practices for reassigning tasks to accommodate team workload changes?
Regularly review task progress and team capacity to identify when reassignments are necessary. If a team member becomes overwhelmed or unavailable, update the task’s assignee in the task details. Communicate clearly about reassignments to maintain clarity and ensure work continues smoothly without unnecessary delays.
Final Thoughts
Scheduling and assigning tasks using Wrike simplifies project management by providing clear visibility and control. Start by creating tasks and setting deadlines to ensure everyone stays on track. Use the drag-and-drop feature to assign tasks directly to team members with ease. Regular updates keep the workflow transparent and efficient. Concluding, how to schedule and assign tasks using Wrike helps teams stay organized and meet goals effectively.